Most homeowners think driveway installation is straightforward—dig it up, pour the concrete, done. But the reality is far more involved, and the difference between a driveway that lasts decades and one that cracks within a few years comes down entirely to what happens beneath the surface and between each step of the process.
Every installation should follow a precise, proven sequence—one that prioritizes durability, proper drainage, and a finished result that genuinely elevates your property. Here’s exactly what that process looks like, from the first site visit to the final seal.
Step 1: Site Assessment and Project Planning
Before a single piece of equipment arrives, the job starts with a thorough evaluation of your property. The team examines the existing surface, soil condition, slope, and drainage patterns. These factors directly shape every decision that follows—what thickness the slab will be, whether the subbase needs reinforcement, and how the edges should be graded to prevent pooling.
This is also when measurements are confirmed and the project scope is finalized. Skipping or rushing this phase is one of the most common reasons DIY and low-cost installations fail prematurely.
Step 2: Removal of the Existing Surface
If there’s an old driveway in place, it gets broken up and hauled away. This isn’t just a cosmetic step—leftover debris, old asphalt, or deteriorated concrete left underneath a new slab creates weak points that compromise the entire structure. Full removal gives the crew a clean slate to work with and ensures the layers below are built correctly from the ground up.
Step 3: Excavation and Subgrade Preparation
Once the surface is cleared, excavation begins. The crew digs down to the appropriate depth based on the project specs and local ground conditions. In areas with freeze-thaw cycles or expansive soils, this step requires extra precision.
After excavation, the subgrade—the native soil beneath—is compacted using heavy equipment. A stable, well-compacted subgrade is the foundation everything else rests on. No amount of quality concrete can compensate for a soft or uneven base below it.
Step 4: Subbase Installation
A layer of crushed aggregate—typically gravel—is spread across the excavated area and compacted in stages. This subbase serves two critical functions: it provides a firm, load-bearing surface for the concrete and promotes drainage so water doesn’t accumulate and undermine the slab over time.
The thickness and material of the subbase vary depending on the driveway’s intended use, soil type, and local climate. This is where working with a skilled driveway installer who understands local soil conditions and load requirements can save you from costly repairs and structural failures years down the road makes all the difference.
Step 5: Forming and Reinforcement
Wooden or steel forms are set up around the perimeter of the driveway to define its shape and contain the concrete pour. These forms are carefully leveled and staked to ensure the finished surface sits at the correct grade.
Depending on the project requirements, steel rebar or wire mesh reinforcement is placed within the formed area. Reinforcement helps the concrete resist cracking under load and from ground movement—an essential step for driveways that will regularly support vehicles.
Step 6: The Concrete Pour
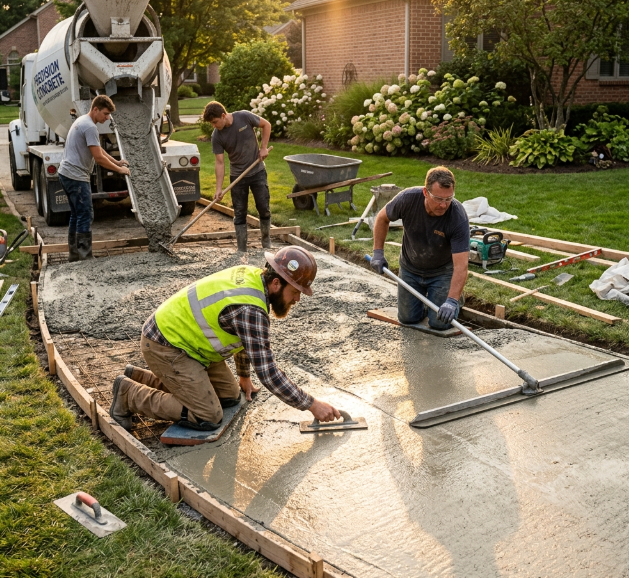
With the forms set and reinforcement in place, the concrete is mixed and poured. This step moves quickly and requires coordination—the material needs to be placed and worked before it begins to set.
The crew spreads and consolidates the concrete using screeds and floats, working it into all corners and against the forms. Proper consolidation eliminates air pockets that would otherwise weaken the slab. The surface is then struck off to achieve an even plane across the entire driveway.
Step 7: Finishing the Surface
Once the concrete is poured and leveled, finishing begins. Depending on the look and function you’re after, the surface can be:
- Broomed for a textured, slip-resistant finish
- Exposed aggregate for a decorative, high-traction surface
- Stamped or stenciled for a custom aesthetic
Edging tools are used along the perimeter to create clean, rounded edges that reduce chipping and cracking over time. Control joints are also cut or tooled into the surface at calculated intervals—these intentional weak points direct where the concrete will crack if it shifts, keeping those cracks hidden and contained.
Step 8: Curing the Concrete
Curing is one of the most underestimated steps in the entire process—and one of the most important. Concrete doesn’t just dry; it undergoes a chemical reaction called hydration that requires moisture and time to develop full strength.
The crew applies a curing compound or uses wet-curing methods to slow moisture evaporation and allow the slab to reach its intended strength. Rushing this phase—or allowing the surface to dry too fast in hot or windy conditions—significantly weakens the final product. Proper curing typically takes a minimum of 7 days before light foot traffic, and up to 28 days before vehicles should drive on it.
Step 9: Sealing the Surface
Once fully cured, a quality sealer is applied to protect the concrete from moisture penetration, staining, and surface wear. Sealing is especially important in climates where freeze-thaw cycles or de-icing salts are a factor, both of which can cause significant surface damage to unsealed concrete.
High-performance sealers extend the life of the surface and maintain its appearance over time.
See also: Fast Business Loan: Quick Access to Capital When Timing Matters
The End Result: A Driveway Built to Last
What you see when the job is done, a clean, smooth, well-finished concrete surface, is the product of every step listed above done correctly. Cut corners on the subbase, rush the curing, skip the reinforcement, and the driveway you end up with will show it, usually within a few years.
A skilled local concrete contractor brings expertise, proper equipment, and a commitment to doing each phase of the process right. That’s what separates a driveway that holds up for 30 years from one that starts showing cracks and settlement long before its time.
If you’re ready to invest in a driveway that’s built the right way from the ground up, reach out to a trusted local concrete contractor today to make it happen.


 By
By